With Stacks, you can control how designs shrink or grow to fit contents and how they fill the space available. Use Stacks to build everything from buttons that resize automatically to full interfaces you can reuse in different sizes.
Creating a Stack
Stacks are frames with layout properties. You can add a stack to empty frames, groups, frames that contain other layers, a selection of multiple layers, or a single layer.
There are a few ways to add a stack:
- Select a frame or layer and press ⌘L.
- Select a frame or group multiple layers and click the Add Stack button in the Layout section of the Inspector. The button won’t appear if you select a single layer.
- Head to Arrange > Stack > Add Stack Layout in the menu bar.
Select a group of layers and click on the layout button to create a Stack
There are similar options to remove a stack:
- Select a stack and press ⌥⌘L.
- Select a stack and click the trash icon in the Layout section of the Inspector.
- Head to Arrange > Stack > Remove Stack Layout in the menu bar.
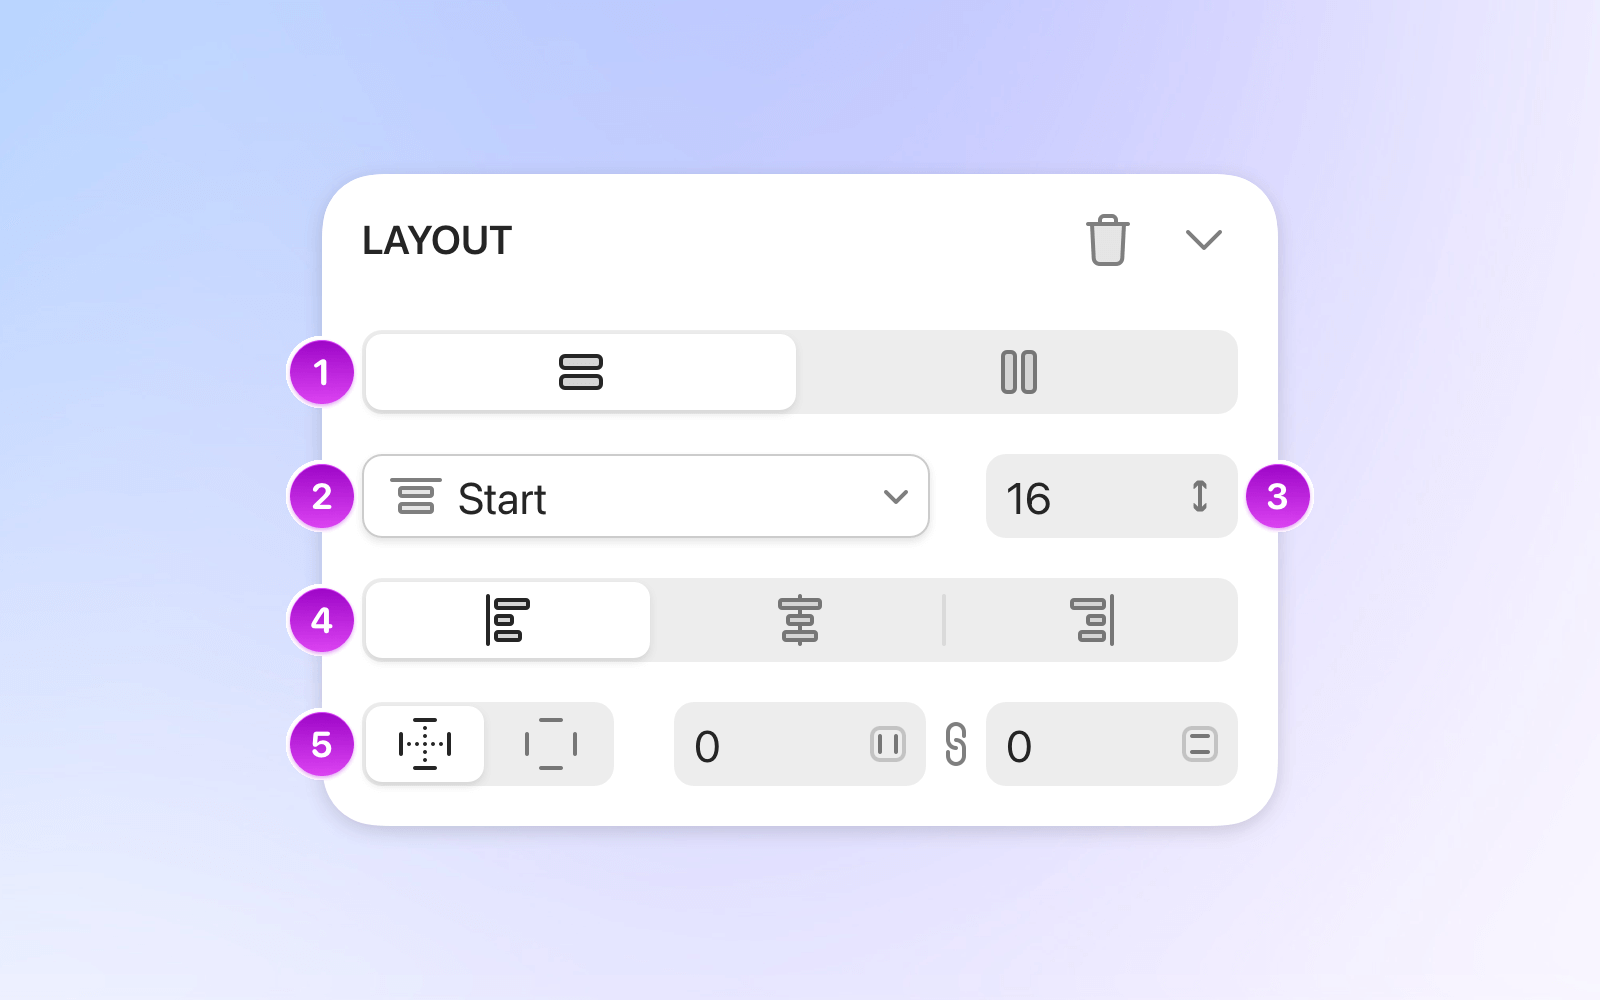
Stack layout settings
You’ll find Stack controls in the Layout section of the Inspector. Here’s what you can change:
-
Direction can be horizontal or vertical. The horizontal direction arranges layers in a row, and the vertical direction in a column. You can set up stacks in both horizontal and vertical layouts — great for things like lists or cards.
- Alignment and Distribution control how layers are positioned within a Stack as its content changes.
- Alignment lets you choose to place all items at the Start, Center, or End of the stack.
- Distribution spreads items across the stack using one of these options: Space Between, Space Evenly, or Space Around.
- Spacing defines the distance between layers in a stack and is related to the alignment or distribution option you choose.
- With alignment options, you can set the spacing manually.
- With distribution options, spacing is set automatically, and the input field changes to Auto.
-
Cross-axis alignment is determined by the stack direction. You can cross-align horizontal stacks vertically to the top, middle or bottom. Similarly, you can cross-align vertical stacks horizontally to the left, center or right. Tip: You can override cross-axis alignment for individual stack items. Select a layer, hold ⌥ and select an alignment option at the top of the Inspector.
- Padding defines how much space is between the stack edges and its contents. When you add a stack layout to a set of layers, a group or a frame, the layers’ positions determine the padding and you can adjust as needed.

- Paired padding sets the same value for each pair, top-bottom and left-right.
- Uniform padding sets the same value for all edges of the stack.
- Individual padding sets a different value for each edge of the stack.
You can also adjust padding directly on the Canvas by clicking and dragging. Select a stack, hover over it, then click and drag the padding handles to make adjustments. As you hover, both the padding handles and padding area are highlighted on the Canvas.
You can adjust padding directly on the Canvas. Whether padding is Paired, Uniform, or Individual determines how it responds when you make adjustments.
Your padding settings — Paired, Uniform, or Individual — also affect how padding adjusts on the Canvas. For example, if you’ve set Paired padding, dragging the top padding will also adjust the bottom padding.
Note: Sizing options also affect how paddings are adjusted. If a stack is set to Fit and you change the padding, the stack will shrink or grow accordingly. If a stack is set to Fixed, padding will increase or decrease within the stack’s dimensions.
Sizing options for Stacks
You can set different sizing options for both the width and height of stacks in the Inspector. These will define how stacks resize.
Nested stacks
- Fixed. The stack will take the size you set in the Inspector. The parent stack can also adapt to fit the contents or keep its dimensions, depending on the selected sizing options.
- Fill. The stack will grow to take all the space available in the stack. If there are multiple nested stacks and all are set to Fill, each one will take an equal part of the space available.
- Fit. The stack will shrink or grow to fit its contents.
Tip: Select a layer or nested stack and press ⌥. Then, double-click on the stack edge to change it from Fixed or Fit to Fill.
You can apply Fit, Fixed or Fill sizing options to nested stacks.
By nesting stacks, you can create complex designs that mix directions and adapt to different sizes. Each nested stack has its own layout and sizing settings, giving you full control over item positioning, resizing behavior, and how content fills the available space.
You can nest stacks by creating a new stack inside an existing one, or by dragging and dropping another one into it.
Non-nested stacks
These are stacks that are not inside another stack — although they can be inside frames, groups or graphics.
- Fixed. The stack takes on the size you set. This applies both when you set the size on the Inspector or when you resize the stack directly on the Canvas.
- Fit. The stack automatically shrinks or grows to fit its contents. If you resize a stack set to Fit manually, it will switch to Fixed.
- Relative. The stack will resize with its parent frame o group.
You can apply Fit, Fixed or Relative sizing options to non-nested stacks.
Tip: Double-click the edge of a stack to change it from Fixed to Fit.
Working with stack items
Stack items are the layers inside a stack: shapes, text, or even nested stacks. You can apply sizing options to these items to control how they resize within the stack.
Sizing options for stack items
Stack items can be set as Fixed or Fill and these settings work in the same way as with nested stacks.
You can set stack items (the layers inside a stack) to a fixed width/height, or set to Fill, to take all the space available.
Note: You cannot set a stack item to Fit, except text layers. Any other layers inside a stack will be set to Fixed or Fill.
Stack items have two additional options in the Inspector:
- Ignore stack layout lets you position an item anywhere you want within a stack. You can apply it at any time — even before creating the stack. Control-click a layer and choose Ignore Stack from the menu, or use the Command Bar. Layers with this setting show an [X] icon in the Layer List.
- Preserve space when hidden keeps a stack item’s space even when the layer is hidden.
Adding layers
You can add new layers to a stack in different ways:
- Insert a shape inside the stack.
- Select a layer, then drag and drop it in the stack.
- Paste a stack or a stack item. The new layer will appear next to the selected item — or at the end if you selected the entire stack.
As you add layers to a stack, you’ll see a guide indicating where the new layer will be placed.
Tip: When you hover over a stack, you’ll see guides that show where the new layer will be placed.
Resizing layers
Resizing or scaling layers has a different effect on the parent stack depending on the selected sizing options.
-
If the stack is set to Fit, resizing will also make the stack shrink or grow to fit its contents.
-
If the stack is set to Fixed, layers will resize inside the stack’s dimensions and other layers may be moved out of the way depending on the resizing you apply.
Removing layers from a stack
Select the layer you want to remove and press ⌫, or click and drag the layer outside the stack.
Rearranging layers in stacks
Drag one stack or layer over another to quickly swap their positions and reorder them.
Select the layer you want to move, then drag it over another layer to swap their positions. You can only reorder sibling items within the same stack. The order in the Layer List will update accordingly.
